Saturday, November 3, 2012

What to Eat When You Can't Eat Anything

As some of you know, I had my wisdom teeth pulled this weekend. Originally scheduled for Tuesday, the day Sandy swept into town, it was postponed until Friday.

Turns out Vicodin and I are in no way compatible, but I'm getting pretty good at ice packs and sleeping on my back. The thing I'm mostly complaining about, to no end, is not being able to eat. I love to eat. I live to eat. Really, I do. Little makes me happier than sinking my teeth into a burger and fries, slurping my mom's spaghetti, reveling in my dad's smothered pork chops, gobbling up sushi rolls, nomming on naan and curry, or popping popcorn shrimp into my mouth, even chowing down on a Taco Bell Chicken Crunchwrap Supreme!...you get the picture.

So, I'm two days in and really struggling to eat soup, soup, and all things slurpable. Because my mouth is swollen in a weird way I really can't chew without biting myself, I'm struggling not to get bored. In an effort to entertain myself, and you, here are some of the things I've been eating!

1. Yogurt, vanilla
2. Chicken stock, microwaved
3. Black bean soup puree
4. Carrot and ginger soup
5. Butternut squash soup puree
6. Green smoothie Odwalla-esque thing
7. Vanilla icing -- I'm not kidding, just icing by itself...I know, judge me why don't you?!
8. Vanilla ice cream
9. Carnation milk breakfast shakes, French Vanilla flavor
10. Hummus, also by itself
11. Guacamole (but only a little, I'm saving it for the refried beans that will be my lunch tomorrow)
12. Cremita de arroz (Cream of rice)

There was the early, abortive attempt to eat a cheese stick because I succumbed to desperation too early. Yeah, I'm not cut out to be a beaver and chew only with my front teeth.

The best things thus far have been yogurt, the black bean soup puree because it's spicy, the green smoothie because I eat that normally, the breakfast shakes (a surprise winner!), and guacamole (because it's the most flavorful thing I've eaten in two days). The worst thing were soups #4 and #5--not my favorite vegetables to begin with. Cremita de arroz was decent, but considering my mom used to make it for me when I was little, there is just no matching those childhood memories.

Anyway, if you ever find yourself in a situation where you physically can't chew or really open your mouth, try eating some of these things. You'll find yourself requiring nourishment every 2-3 hours, which is quite difficult, but hey, you'll become a connoisseur of soupy sustenance.

I can't wait to catalog my post-op binge. Get ready for burgers, pasta, ribs, taco bell, fried chicken, and who knows what else! I'm taking suggestions!

Happy eating! 

Monday, October 8, 2012

Fish 'n Potatoes

Hi y'all! As I mentioned in my last post, I could easily be a pescatarian. Well, after saying that I realized that I had no actual fish recipes up on this blog and that I had this meal waiting in the wings. 

It's definitely more traditionally American (or what I perceive to be American!) than what I normally get my eat on with, but it was definitely satisfying. So, without any further ado, here's....

 Scallion-Crusted Scrod with Accordion Potatoes

1 lb scrod* fillets, deboned
3-5 scallions, chopped fine
1-1.5 cup Japanese breadcrumbs or Panko
Lemon, 1 tsp. zest and 1 tbsp. juice
2-3 oz. baby spinach
Olive oil
2 cloves of garlic, minced
Salt
Pepper

*Scrod is baby cod, and since cod is a flaky, dense white fish without a lot of unique flavor, any ol' white fish will do.


Preheat your oven to 375, then dice up your scallions and mince your garlic. Zest your lemon, and then mix these ingredients in with your breadcrumbs. The quantity of breadcrumbs depends on how large your fillets are. Sauté the breadcrumbs, scallions, and garlic all together for ~3 minutes or until breadcrumbs turn golden brown. Take care not to burn them! 


Next you can prep your potatoes. Slice them almost all the way through, ideally 1/8th of an inch apart. I was in a hurry, so as you can see my knife work is pretty ugly. But, I wasn't cooking to impress anyone other than my own stomach, which really doesn't care what food looks like. I will note, however, that the potato will be ready more quickly if the slices are narrower.

Once you've got your incisions, drizzle the potato liberally with ~2 tbsp olive oil and as much salt and pepper as you want. I've put the scallion stems here to try to add a little onion flavor to the potato, which might have worked a little. I'm being honest here, I didn't notice much difference but it made me feel cool and experimental, hahah.


Next, dip your fish in a little olive oil or egg white and cover it in as much breading as will stick.  Place it on a greased baking pan, preferably lined in tin foil to speed up clean up.


Cook for 15-20 minutes, or until the fish flakes easily with a fork. Throw a bed of spinach down on the plate, reuse that zested lemon for lemon juice to top the fish and dress the spinach, and voila! Your very own fish 'n potatoes meal:


Pair with whatever beverage you'd prefer, but may I suggest Joel Gott sauvignon blanc? For $14.99 a bottle, it's delicious, crisp, and very tasty. Even better, it comes with a screw top so you can save it for another day if you don't drink it all in one sitting...


 Happy eating, so long, and thanks for all the fish!

Monday, October 1, 2012

Shrimp 2 Ways

As the old saying goes...double the shrimp, double the fun!

While that may not be the saying, it's definitely true in my case. I love shrimp. I could seriously be a pescatarian and give up meat if I could have seafood every single day. And that's saying a lot, because I love meat. Maybe it's the Caribbean in me, but seafood just does something special for me.

To keep my diet varied while living on my own in the real world, I like to get frozen, pre-shelled shrimp from Trader Joe's that I can just cook up in a jiffy whenever I want. It doesn't really matter if they are pre-cooked or not since shrimp take so little time to cook.

Now, some people may be sticklers for shrimp with the shells on, and I do understand that. I even made my own shrimp stock at the beginning of the summer under the influence of Chef John Besh's cookbook My New Orleans, which is truly impressive and convinces you that the only way to cook is to spend hours slaving away over a hot stove and make everything from scratch. Oh, and raise a farm in your backyard. Suffice it to say, I never used that stock after I made it and it sat in my freezer for a month. So the net of that experience is that I now simply buy pre-shelled shrimp!

So, on to what I made:


Creamy Cajun Shrimp Linguine...found it on Pinterest!


Celery Shrimp Sauté with Guacamole Toast


So, how to make it? Here we go:

Creamy Cajun Shrimp Linguini
Original recipe found here


1 cup water
1 (14-ounce) can fat-free, less-sodium chicken broth
6 ounces uncooked linguine (I just substituted pasta)
1 pound medium shrimp, peeled and deveined
1 1/2 tablespoons butter
1 (8-ounce) package presliced mushrooms*
1 large red bell pepper, cut into (1/4-inch-thick) slices
2 teaspoons all-purpose flour
1 teaspoon salt free Cajun seasoning (I found mine in the bulk spices at my local supermarket)**
1/4 teaspoon salt
2/3 cup fat free half-and-half
1/4 cup chopped fresh flat-leaf parsley
Parmesan cheese (my addition)


*Didn't have any mushrooms
**The Cajun spices here must be different, because this came out kind of sweet. I compensated by adding Adobo...awww yeah. 

So from that point on I basically followed the steps of the recipe, which are below:

Combine 1 cup water and broth in a large pot and bring to a boil. Break pasta in half; add to pot. Bring mixture to a boil. Cover, reduce heat, and simmer for 8 minutes. Add shrimp to pasta. Cover and simmer for 3 minutes or until shrimp are done; drain and set aside. Melt butter in a large skillet over medium-high heat. Add mushrooms and red pepper to pan; sauté 4 minutes or until moisture evaporates. Add flour, Cajun seasoning, and salt to pan; sauté 30 seconds. Stir in half-and-half; cook 1 minute or until thick, stirring constantly. Remove from heat. Add pasta mixture and parsley to pan; toss together with tongs. Add Parmesan cheese!
My main piece of advice for this is to prep (wash, cut, etc.) all the ingredients beforehand because this recipe moves along at a quick clip! Also, as the original recipe notes, the pasta is much better cooked in broth because it absorbs that flavor. I wasn't able to do it because I had leftover plain spaghetti, but I want to try it again. On to recipe number two!
This recipe is something I threw together off-the-cuff, but more or less this is what went down:
Celery Shrimp Sauté with Guacamole Toast
Shrimp, as much as you think you'll eat
1 tbsp. olive oil
Celery, 1 stalk per serving
1/2 a yellow onion
Red pepper flakes
Whole wheat baguette slice, halved
Salt and pepper, to taste
Guacamole
Wash the celery, then halve it lengthwise and chop it; dice up the onion and set aside. Slice the bread in half, toast it, and set it aside. (You can always warm it up later and there's nothing worse than waiting for your bread to toast as your hot food gets cool.) Heat the oil in a frying pan on medium high heat and put the celery and onions in at the same time. Normally I wouldn't advocate that for veggies, but celery is high in fiber and takes a while to cook through, so it's okay to put it in with onions. Be sure to stir periodically to make sure the onions don't burn. At this point, add in red pepper flakes so that they have started releasing their heat before you add the shrimp. Next step is--you guessed it--add the shrimp! Cook for 3-5 minutes, until pink and no longer grey. Add the salt and pepper before you finish the shrimp. Finally, reheat the bread if necessary, slap some guac on there, and eat! Eat, eat, eat!
See, double the shrimp equals double the fun! And definitely double the noms!
Happy eating!

Back in Blog! With Flatbreads...

HELLO! I have been absent. I know! I know, I missed you too. I brought you a present:

I ate both of these in one sitting, alternating between each because they were THAT GOOD.


I figured I'd start off with something easy and cheesy, since I'm easing myself back into being a responsible food lust-provider.

A few months ago I made these on the spur of the moment after deciding I wanted pizza and I wanted it my way (Burger King doesn't make pizza, as far as I know). Having only bread, I decided to make flatbreads instead. I'll start with the top pizza:

Spinach and Mozzarella Marinara Flatbread

Preheat oven to 400 degrees
Rustic Italian or French bread (I like Whole Foods' pain de campagne), toasted
Spinach, as much as you want
Marinara (I made mine but from a jar is just fine)
Sliced mozzarella

The second edible is a...

 Mushroom and Green Olive Pesto Flatbread

Preheat oven to 400 degrees
2 portabello mushrooms
Rustic Italian or French bread (I like Whole Foods' pain de campagne), toasted
Sliced mozzarella
Green olives stuffed with garlic
Trader Joe's pesto (amazing!)

For each flatbread, I recommend toasting the bread first until it's pretty dark so that it won't buckle and become soggy under the weight of all the sauces and moisture (cheese and mushrooms both release moisture when melted). I also recommend making the marinara a little spicy to balance your generous portions of mozzarella, and even adding some meat into the sauce. Really, you can put anything you want on bread with cheese, it's up to you!
The garlic-stuffed green olives came from my local grocery store. After you toast the bread, just load up each piece with what you want and pop it in the oven for 15-20 minutes, or until the cheese has melted. Don't panic if your cheese doesn't melt right away because mozzarella has a higher melting temperature than something like cheddar. When done, consume immediately!
Returning to the TJ's pesto, briefly. I am a pretty harsh judge of pesto, namely because I was subjected to sub par, greasy, gross pesto for 4 years (here's to you, Harvard). Trader Joe's pesto is well-balanced and flavorful. You can taste the basil AND the garlic, without being overpowered. The oil is perfectly proportioned to the pesto, and if it separates it stirs back together quickly without making me feel queasy about how much oil I'm about to consume. It's also refrigerated and must be refrigerated even before opening, so you know it's fairly fresh. I'm sure Whole Foods' pesto is comparable if there isn't a TJ's near you.
So that's that, happy eating! And look forward to more posts soon =).

Friday, June 8, 2012

Living in Style (in New York): Part I

Hi y'all! I'm back from an unofficial hiatus--what with essays, end of year assignments, and GRADUATION(!?) I decided to write once I was officially settled in New York. What a whirlwind it's been! I start work in a little under two weeks, but until then I've been setting up my apartment and decorating my room.

This will be the first in a two- or three-part series about decorating an apartment on a budget in New York, and the lengths I've gone to in order to have my room perfect. The motto that has served me well when searching for the perfect things to create my perfect room: Have unreasonable expectations and never compromise them. What you want does exist, and you will find it if you work hard enough.

Since I just graduated I'm obviously on a very tight budget, which has led me to decorate and furnish my apartment mostly with things from secondhand stores, Marshall's/TJ Maxx, flea markets, and the fabulous Salvation Army on 46th between 10th and 11th. My two favorite second hand stores are both in Chelsea on W 17th and 7th.

 Angel Street Thrift Shop:


Photo credit to Angel Street Thrift Shop


And Housing Works:


Photo credit to Housing Works


Here are several examples of the awesome things to be found at thrift shops:

From Angel Street Thrift, a Bombay curve dresser in mahogany with original fittings, $250


 GORGEOUS art deco wardrobe from the 1920s, found at Angel Street Thrift. It's a blessing I bought my dresser (below) before I saw this, otherwise I instantly would have dropped $450 on it.


This is my dresser. Originally a wood sideboard to keep fine silverware and your best heirloom china set, I have converted it to my dresser.The spice cabinet on top isn't part of it, and while it doesn't look it in this picture, it's actually six feet long. A bargain at $175 from Housing Works.


 This is truly special: a remnant of an old Cathedral pew for $60 at Housing Works. As of Wednesday it was still there! My mom could barely stand leaving it behind, but the shipping price to Texas would be absurd. I'd buy it just because it's awesome, but there is nowhere to put it! Sob...


A pretty hanging lantern for $45 from Angel Street Thrift.


 A totally cool chandelier-style lamp for $45 from Angel Street Thrift.


This is $55 at Housing Works and is a nice low bedside table or TV stand. It has sliding drawers inside of it and is in great shape.


Also on that street are a few home design stores like West Elm and Canvas, but I am staying away from stores like that. Instead, I'm hitting up flea markets. So far I've been to two. I really like the Hell's Kitchen Flea Market at W 39th and 9th every Saturday and Sunday:


They take their location in "Hell's Kitchen" very seriously


And the GreenFlea Market on the Upper West Side at 77th and Columbus:


And here are some examples of very cool things found at these fleas, as people in the know call them, hahah:


$45 at the GreenFlea for a mirrored vanity tray (or tea set tray). I want something just like this but longer, since my dresser is so long.


The first furniture piece I bought for my apartment at the Hell's Kitchen Flea Market--I bought it on the spot without seeing any other chairs. Very comfy and I haven't seen anything like it since; sometimes you just have to take a chance. It was $85 and a total steal, aided by the fact that my mom reupholstered it for free (best Mom ever!). More on that later.


This is a very cool tin which, once cleaned up, would be a great place to store receipts and important papers on your dresser, vanity, or bedside table. $20 at the GreenFlea Market.


This very unique book stand is from the 1950s or so and was $23 (down from $25--woohooh...) and is PERFECT for my Bible. I found it with my friend Andrea at the GreenFlea Market.


 These are very cute, colorful key/purse/umbrella/etc. holders that are handmade for only $7. I found them at the GreenFlea Market and I think my roommate and I are going to go for the light blue one.


This mirror I haggled down to $100 from $185 but decided to leave it, because even though I need one just like it for my dresser top, I simply didn't love it. Still, it's a really nice, large antique mirror at the GreenFlea Market.


Last but not least, I will share what I've found at the Salvation Army. They have a really wide variety of things, and they have yet to fail me when I go look for furniture. As a side note, always clean whatever you buy secondhand because even if it looks clean, it's secretly filthy and carrying all kinds of fun allergens and germs.


This is the TV stand I ultimately bought, because while there was a nice dark one, this one had fewer scratches and the bonus of glass doors. It was $50, and after some cleaning it looks practically new.


 Case in point: this incredible cast iron and marble lamp that is by far the best bargain I've found--$40 including the original shade (not pictured)!!! This lamp is likely an antique, and it would cost many times that brand new. I LOVE the Salvation Army. you can see by comparing the above picture to the below that it cleaned up nicely with soap, water, a brush, and a dishrag. You'll see the whole lamp when I blog about my room.


Very Classic in style and utterly romantic. The detail on the base (another post to come) is just lovely. 

So those are some examples of what I've found hunting around for Manhattan's buried treasures, and what you can find too with a little elbow grease and determination. More to come later on what I've bought for my room, what it's like to build a pressurized wall, and custom decorating.

Happy decorating!

Monday, April 2, 2012

Jewelry

It's been a while since I've written, but I'm back! Today I'd like to feature my friend Alex's jewelry over at her site Alexandra Jewelry, which is absolutely fabulous and very affordable.

She makes it all herself (including soldering metal, which really impresses me!). Speaking as someone who's seen several of her pieces in person--since she's her own best model--I can tell you that they are visually stunning.

Here are a few of my favorite pieces for sale right now, but you should definitely go browse her site yourself!


Bulb Earrings - Blue/Pink
GORGEOUS. Saw these on a friend at a final club last weekend in the green and clear version and they looked fantastic!


Chip Necklace
A quirky symmetrical necklace in gold. I love how the tiny circular chain details set off the diamond-shaped pieces.


Chandelier Necklace
Obsessed with this necklace since last summer: it's made of antique chandelier. You can't get any more chic than that!


Happy shopping!

Monday, February 27, 2012

New Shoes

I'm very excited for these shoes which I ordered today for $39.99 from Urban Outfitters! I tried them on in the store but they were too small, and for such a good price, free shipping, and in-store returns, I just couldn't resist picking up this kind of shoe that I've been wanting for a while now.


 The cutout makes these booties versatile enough to let me wear them into summer as opposed to just being a standard fall-winter boot.

 I do love the corset-like lacing.

 The subtle detail of the divided heel adds a little something to these shoes.

When they come in I'll post up pictures of how they look in person! If you're interested in getting them, you can find them on the Urban Outfitters website here.


Thursday, February 23, 2012

On my soapbox

The exoticization of non-white, non-"Western" cultures (the word "Western" is problematic in itself, but that's a whole other post) is not a new thing, either in fashion or in society at large.

 "Tribal print." "African-inspired." "Geisha-style." "Pocahontas." However, it's still wrong, and still frustrating, particularly when it's such a huge stretch as in the quote from Harper's Bazaar that I'll get to in a minute.

It's one thing when a designer says, "My collection was inspired by traditional African prints and motifs." This is problematic in the fact that Africa is not one homogeneous country, but a continent composed of countries, cultures, and ethnic groups as diverse as can be imagined.  Yet, when compared to our own textile tradition in America/the "Western" world, there is an undeniable uniqueness to many geometric prints and motifs that come out of countries in Africa. Even so, I found the following quote from Harper's Bazaar overly reductionist, and unpleasantly reminiscent of Imperialism/Orientalism, and the exoticization of the Other, that which is different.

Perhaps I'm making a big fuss over nothing much, but something about this bothers me, particularly when referencing the accomplishments of a Chinese American:

"It was hard to pin Derek Lam's African reference down, but the undeniable mix of earthy colors and geometric patterns were tribal in theory."


I don't see it. Do you?

This outfit (the one that was paired with the quote) looks very mod to me, as though he played around with geometric forms like squares, circles, and honeycombs. Yes, the colors are earthy. Yes, the patterns are geometric. But if it's "hard to pin" the "African reference down," and you have to force the connection "in theory,"--without naming the theory--then there isn't a connection. 

I have to wonder if Lam's collection would have been labeled "African-inspired" had it come from Michael Kors or Stella McCartney, neither of which venture far for their inspiration. 

/Edit/ I should note that they described other collections as "Out of Africa," too. Yet even then there were problematic statements, such as admitting that one collection wasn't particularly African apart from a "frizzy hair style." That's extremely problematic in itself, but I think the insistence in the aforementioned quote is what really got me bothered.

Friday, February 10, 2012

In the Land of Milk and Honey

Hello all! As I write this post I'm currently in the big Starbucks in Harvard Square, feeling eminently cool and snooty, hahah. It's a nice environment if you like white noise around you when you work. I decided to treat myself to coffee since I'm having a relaxed day, and since I successfully managed to end my coffee addiction about two weeks ago. It may seem a little contradictory to treat myself to coffee as a reward for ending addiction to it, but it works for me!

On to the food. Last night my beautiful friend Caitlin and I got "Becky Home Ec-y" (great phrase, thanks Caitlin) and made these Pear and Almond Upside Down Cakes from Baking Bites, a blog I've been following since high school. Really great stuff! And these little "cakelets," as BB calls them, are extraordinary:


 "If we were in the land of milk and honey, these would grow on bushes there."
They're REALLY that good.


There is no way to fully convey to you, dear Eater, how delicious these are. They are magical. Perfect. Succulent. Decadent. Amazing. They are one of the greatest sweets I have ever eaten.  If there was such a thing as a dessert for a brunch party (or really any darned time of day) these would be ideal. Truly, they are a marvel. And so, so, so easy to make! Here's the recipe, with a few edits of my own:

Upside Down Pear and Almond Cakes

Makes 8 cakes

2 tbsp butter, cold and cut into 8 small pieces
1/4 cup brown sugar
1 whole large pear (or two small pears)
1/2 cup all purpose flour
1/2 cup almond meal (finely ground almonds/almond flour)* 
1/2 cup sugar
1/2 tsp baking powder
1/8 tsp salt
2 large eggs
1 tsp vanilla extract
1/4 tsp almond extract (optional)**
2 tbsp butter, melted and cooled

*I substituted all purpose flour, so I essentially used 1 cup of flour.
**Because I didn't use almond meal I added in 1/2 tsp of almond extract, not just 1/4 tsp.

I will note that we doubled the batter and got 12, not 16 cakes, but this is because we overfilled the cups. Only fill them halfway; they rise a lot and you'll want flat bottoms. See the steps for more detail on this.

Steps:


1. Preheat oven to 350F.

2. Line a muffin tin with 8 paper liners (If you don't have them, like me, your cakes will be just fine but you'll lose some of the brown sugar/butter topping. Next time I will be making them with the liners because that stuff is delicious). Place one small piece of butter into each muffin cup. Top each cup with 1 1/2 teaspoons of brown sugar. Place pan in oven for 3 minutes, just until butter melts. Sugar will not be fully melted. Allow pan to cool for a few minutes before proceeding.

3. Taking care to slice around the core of the pear, cut pear into very thin slices no more than 1/8-inch thick.
Lay about 3 slices of pear across the bottom of each muffin cup (enough to cover the base, but it's absolutely fine if you they go up the sides), on top of the butter and brown sugar layer. Set aside while you make cake batter.

4. In a large bowl, combine flour, almond meal, sugar, baking powder and salt and whisk until well-combined. Add in eggs, vanilla extract and almond extract and whisk until batter is smooth. Add in melted butter and whisk until butter has been completely incorporated. Props to Caitlin for reminding me to double this second use of butter, otherwise they wouldn't have been as moist or yummy!

5. Divide batter evenly into prepared muffin cups on top of the of pear layer. Only fill the cups halfway as they rise a lot (you want flat bottoms because they're upside down cakes--you can see in the picture that we overfilled the cups because they do not lay flat and we only got 12 out of the mix, not 16).

6. Bake for 19-22 minutes, until the cakes spring back when lightly touched (they'll be a light yellow color) and a toothpick inserted into the cake comes out clean. Brown sugar may be bubbling slightly around the edges of the cake.


So close to heaven you can almost taste the sunlight and the clouds...

7. Take cakes out of the muffin pan and allow to cool on a wire rack in their paper liners. If you do not have liners, just run a knife around the edges of the cupcake to dislodge them. Cakes can be served fresh out of the oven or at room temperature. Invert cakes onto a plate and remove paper to serve.

Et voilà! There you have DELICIOUSAMAZINGZOMGGGGGGG...drool...cakes! Best served piping hot and gooey on top!


If you told me I could never eat anything but these for the rest of my life, I might actually be okay with it. 


Happy eating!!

P.S. I WILL be making these in mini form for the Master's open house in Mather this Thursday. Come 'n get it, y'all!


Wednesday, February 8, 2012

My Favorite Cookie: Sandtarts

Today I decided to bake my favorite cookie since childhood: sandtarts. It's been a few years since I've made these delicious little cookies chock full 'o goodness, but it was time. Mostly because I was already in an almond mood as I waited for the pears to ripen to make almond and pear upside-down cake (next post!), and sandtarts are so amazingly almond-y.


Mmmmmmmmmmmmmmmmmmmmmmmm........


What are sandtarts? By another name, they are Mexican wedding cookies. They often have nuts. My family's version which I've been making with my mother for as long as I can remember is better than Mexican wedding cookies and has no nuts, which makes them a safe party treat!

The recipe is extremely simple, and is as follows:


Sandtarts Ingredients

Serves about 35 depending on how large you roll the balls of dough

¾ cups butter
4 tbsp sugar (heaping)
2 cups sifted flour
~2 tsp vanilla
1 tbsp cold water
2-3 tbsp almond extract

Cream butter and sugar; add remaining ingredients; mix well.Pinch off  into roughly 1 inch bits of dough and rollinto balls. Bake at 350 for 30-40 minutes. Allow to cool for 20 minutes before putting confectioner's sugar over the top, otherwise it will just melt the sugar. 

Sift confectioner's sugar over the top or roll cookies in powdered sugar and enjoy!

Here's a picture of the dough:


It's a big bowl, but it doesn't make that much dough so make the balls small to get the most mileage out of it!


Here's a picture of the size of the dough balls. They're actually a bit smaller than 1 inch:


Here's a picture of them (all 38 of them!) when I pulled them out of the oven:


A close-up for the varieties of color and shape. As you can see, they don't really flatten out much.


Final product post-sugaring! As a side note, I used a colander (yes, like a spaghetti colander) to "sift" the sugar over the top. Necessity is the mother of invention!


Mmmmmmmmmmmmmmmmmmmm!!!!!!

Happy Eating!!


Thursday, January 12, 2012

DIY: Nook Cover Closure

Hi everyone,

Today I'm going to show a little Do It Yourself project I did on my new Nook Color cover/case to let me keep it closed. You can replicate it on a Kindle case, or even an iPad case, depending on the design.

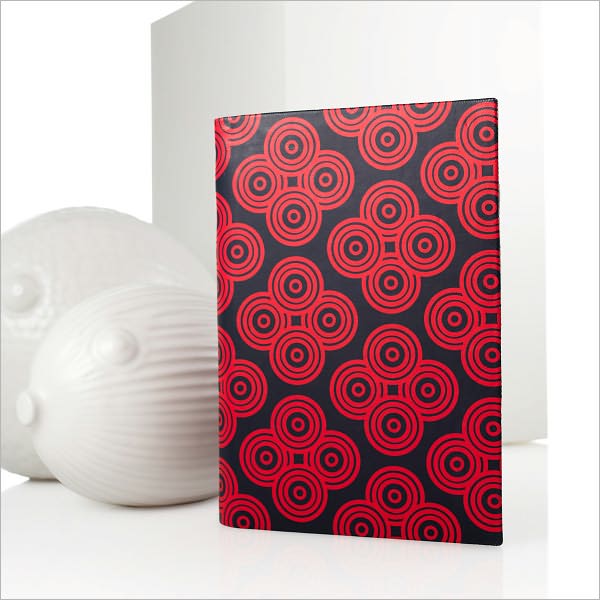
 It's a lovely leather case by Jonathan Adler for Barnes & Noble, but it had one problem: it had no closure. Now this probably isn't a big deal, except for the fact that I kept having visions of freak in-purse accidents happening--a pen slips in between the cover and the screen, I drop my bag, and crack! Or, the gum works its way free of the Orbit paper container and the New York heat melts it onto my screen...disaster. Plus the case was overpriced in the first place (as all these fancy cases are) and I just couldn't believe it didn't come with a buckle or something! So, not about to return the totally cute case, I thought up an incredibly cheap and simple solution that doesn't damage the leather at all.

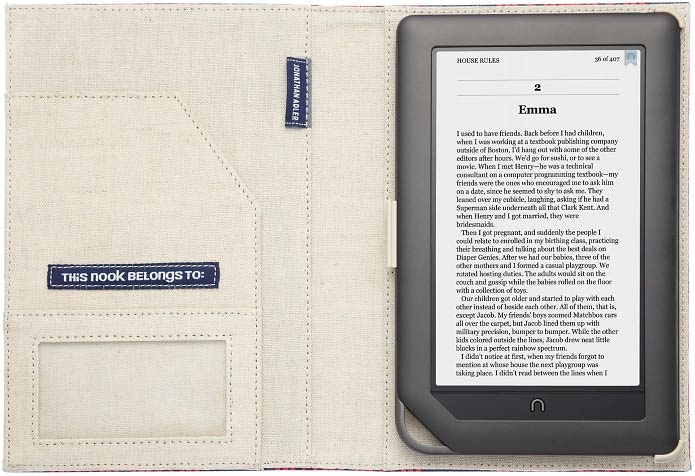
This is the case originally, first the outside and second the inside:

Jonathan Adler Mandala Cover in Navy and Red
Pictures courtesy of Barnes and Noble website. No clue what those white porcelain things with the eyes are in the background. Fish?


Jonathan Adler Mandala Cover in Navy and Red
Emma is one of the worst literary heroines of all time. She's completely unlikable. Eugh!


The tools I used were a hodgepodge borrowed from my mom's sewing desk. Thanks, Mom!


Don't worry, guys, I know not everyone has a curved needle or a seam ripper (far right), but most people have some combination of an X-acto knife/paring knife + small scissors/screw driver + needle. 

The last thing I took was a stretchy closure from one of my dad's file folders that was laying around. It probably costs 50 cents at CVS. This black elastic thing here:


Step #1: Draw a dot in pen about midway down the inner cover, as close to the seam as possible so as to let the cover close fully once the metal anchor of the elastic band is in place.

Step #2: Poke X-acto knife or paring knife through hole; twist to enlarge the hole. Then, if you have a needle that gets wider from point to end, poke that through to try to get the hole bigger. The idea is to be able to fit a loop of the elastic into the smallest hole possible to keep it as secure as possible.

Step #3: Twist the scissors (keeping the blades closed as in photo) or small screwdriver through hole, wiggling back and forth to enlarge a bit further. Do size checks by trying to fit the loop in periodically (from beneath the flap--you want the metal anchor to be hidden). When it seems plausible, then you go to Step #4.

Step #4: Hello, welcome to Step #4. Here, we poke the elastic with a needle--NOTE we do not THREAD the needle, we poke the elastic through with a needle (I used the curved one), like this:


Step #5: Work the needle through the hole, and once the elastic begins to show through on the outside, pull it through while pushing the needle. 


Step #6: Pull through all the way until the metal anchor is flush with the flap! Pat yourself on the back, you're done!


This is what it will look like on the outside, closed two different ways:


Oooooooh!


Aaaahhhh!


And there you have it! A great, super cheap fix up for an otherwise great Nook case. I was really happy with this project!


Bonus/DIY #2: I also came up with an idea for that empty "This Nook belongs to:" spot.  I'll be taking a rectangular piece of paper, folding it in half width-wise. On the outer flap, decorate it with something cool, maybe some abstract scrolling intaglio I used to doodle compulsively in high school, or a mini collage of flowers from a magazine. On the inside, my actual contact information. This way, no subway creeper can lean over and memorize/copy down my information without me knowing, and I get to personalize my Nook even more! I'll post up a picture when I actually do it. For now--I'm lazy, bahah.

Happy Reading!